
A resistance band set can be the simplest way to train consistently, but it also gets frustrating fast when the bands feel too light, roll up, or you are not sure what “levels” actually mean.
If you want strength, mobility, or a reliable warm-up tool, a complete set usually beats buying one random band because you can scale tension as you improve and you can cover more exercises without improvising unsafe anchors.
Below is a practical way to choose the right kit, spot quality, and actually use it, without turning your living room workouts into guesswork.
What “Complete” Really Means in a Resistance Band Set
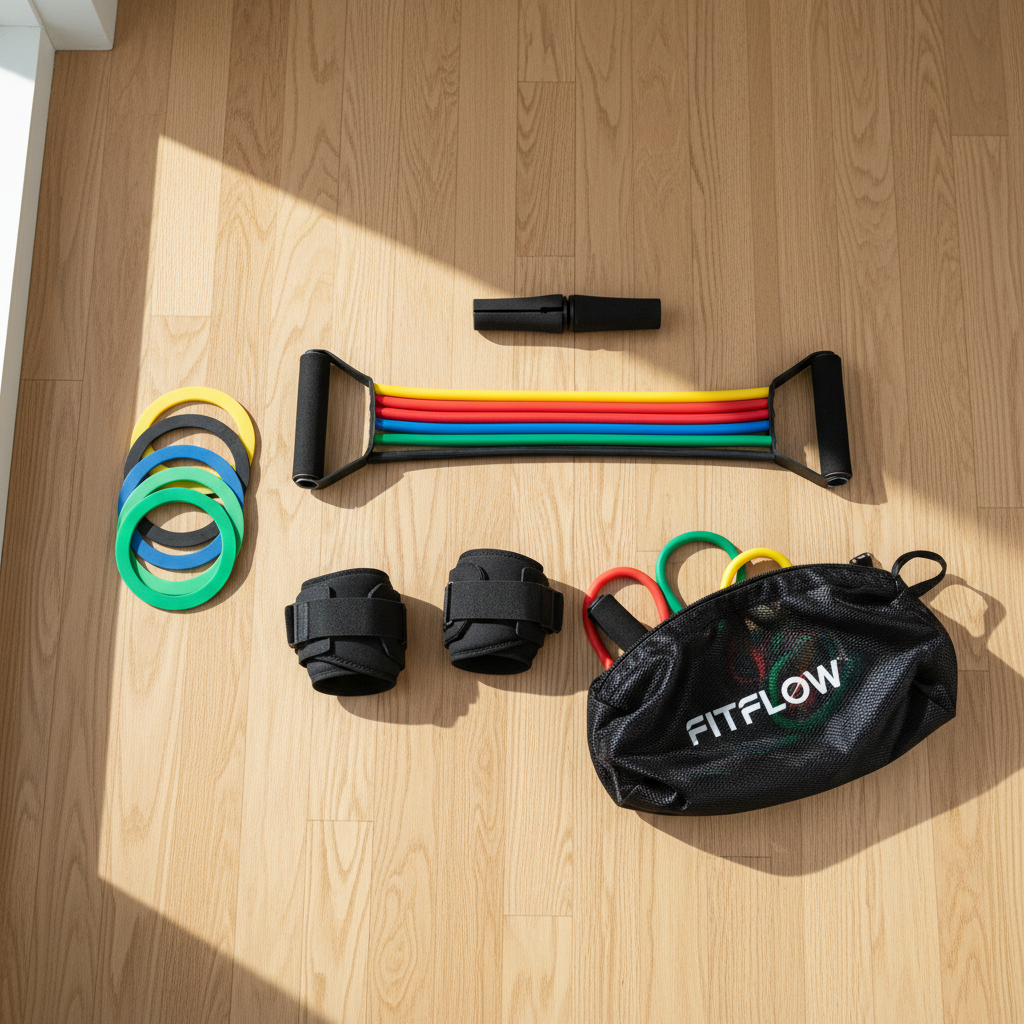
“Complete” gets used loosely, so it helps to translate marketing into real training use. A well-rounded kit usually supports pushing, pulling, squatting/hinging, core, and rehab-style work.
- Loop bands (flat, continuous): great for glute activation, assistance on pull-ups, mobility drills, and progressive overload when combined with weights.
- Tube bands with handles: easy for rows, presses, curls, and fly variations, often the most beginner-friendly.
- Mini bands: small loops for hips and shoulders, fantastic for warm-ups and physical-therapy-style work.
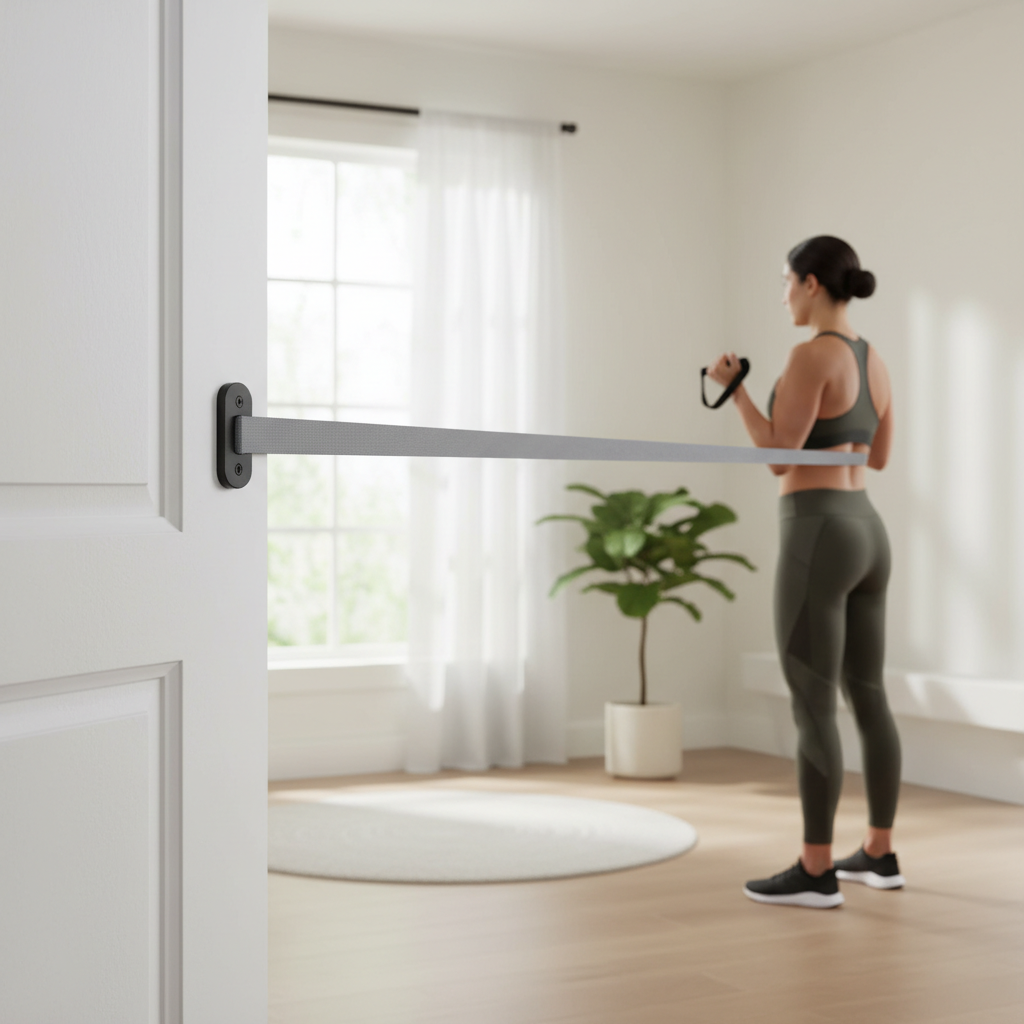
- Anchor options: a door anchor or strap system matters more than people think, it expands exercise variety and improves consistency.
According to American Council on Exercise (ACE), elastic resistance can be an effective way to build strength when used with appropriate intensity and progression, which is exactly why having multiple tensions in one kit matters.
Quick Fit Check: Which Band Kit Matches Your Goals?
This is the fastest way to avoid buying the “wrong” set. Use the table like a pre-check before you add anything to cart.
| Goal | What to prioritize | Common mistake |
|---|---|---|
| General strength at home | Tube bands + handles, door anchor, 5 tension levels | Only mini bands, then you run out of challenge fast |
| Glutes and legs | Mini bands + thick loop bands, non-slip material | Picking ultra-thin loops that roll and pinch |
| Pull-up assistance | Long loop bands with higher tension options | Buying short loops that cannot safely wrap the bar |
| Mobility and rehab-style work | Mini bands + light loop bands, comfortable stretch | Going too heavy and “muscling through” range of motion |
| Travel workouts | Compact set, durable bag, simple anchor | Skipping the anchor, then half the exercises disappear |
How to Judge Quality (So Bands Don’t Snap or Feel Awkward)
Most people blame themselves when training feels weird, but a low-quality resistance band set can make even good programming feel off. Here is what tends to matter in real use.
Material and feel
- Latex vs. fabric: latex often feels smoother and stretches predictably; fabric mini bands usually grip better for legs but can feel stiff for some mobility drills.
- Powdery coating or strong odor: not always a deal-breaker, but it can signal cheaper finishing, many people end up not using bands that feel unpleasant.
Hardware and attachment points
- Carabiners, D-rings, stitching: look for tight stitching and sturdy connectors, especially if you plan on high-tension rows or presses.
- Handles: padded handles reduce grip fatigue; thin plastic handles tend to distract you from the target muscles.
Tension clarity
“10–50 lb” labels vary by brand and stretch length, so treat them as relative within the set, not an absolute promise. What you want is clear progression: light, medium, heavy, very heavy, plus something in between.
Safety and Setup: Small Details That Prevent Big Problems
Band training is low-impact, but it is not “no-risk.” If you have joint pain, recent injuries, or you are post-surgery, it is smart to move slowly and consider checking with a qualified professional.
- Inspect before each session: small tears, cracks, or fraying near connection points often show up before a failure.
- Anchor like you mean it: use a door that locks, test the anchor with light tension first, and pull in the direction that keeps the door closed.
- Mind the line of pull: keep bands away from your face and don’t stretch them across sharp edges.
- Control the return: most “band injuries” happen on the way back, when tension pulls you out of position.
According to Occupational Safety and Health Administration (OSHA), using equipment as intended and inspecting it before use helps reduce preventable injuries, that general principle applies well to elastic training tools too.
A Simple 3-Day Plan Using One Resistance Band Set
If you want something you can start this week, this structure works for many people and scales as you get stronger. Aim for 2–4 sets per move, stop 1–3 reps before form breaks down, and pick a band level that makes the last reps feel challenging.
Day A (Full body strength)
- Band squat or band front squat
- Standing chest press (door anchor)
- Seated or standing row (door anchor)
- Dead bug with mini band (light tension)
Day B (Hinge + upper back focus)
- Romanian deadlift with loop band under feet
- Lat pulldown (door anchor high)
- Face pull (door anchor high)
- Pallof press (anti-rotation core)
Day C (Glutes + shoulders)
- Glute bridge with mini band
- Overhead press with tube bands
- Lateral raise (light-to-medium)
- Hamstring curl (anchor low)
Key point: progression with bands usually means stepping farther from the anchor, using a thicker band, slowing tempo, or adding reps, not just yanking harder.
Common Mistakes That Make Band Workouts Feel “Useless”
A resistance program can be solid and still feel ineffective if execution misses a couple basics. These are the issues that show up most.
- Too much slack at the start: if the first half of the rep has no tension, you lose training effect, step out until you feel resistance immediately.
- Chasing burn instead of control: bands make it easy to move fast, but speed often hides weak positions.
- Only training what feels easy: lots of people live on curls and kickbacks, then wonder why posture and strength do not change.
- Not logging anything: write down band level, distance from anchor, reps, and tempo, that is your “weight on the bar.”

When You Might Need a Coach, PT, or a Different Tool
Bands are versatile, but they are not the perfect answer for every body or goal. Getting help is usually worth it if any of these sound familiar.
- Sharp pain during pressing, pulling, or squatting patterns, especially in shoulder, elbow, knee, or lower back.
- Progress stalls for weeks even after you adjust tension, volume, and exercise selection.
- Post-surgery or complex injury history, where exercise choice and range of motion really matter.
In those cases, a qualified coach can fix form and programming quickly, and a physical therapist can help if pain or movement limitations stay persistent.
Conclusion: Buying Smart, Then Training Consistently
A good resistance band set is less about having “everything,” more about having the right mix of tensions, a safe anchor, and a plan you will repeat. If you pick a kit that matches your goals and you track progression the same way you would with dumbbells, band training stops feeling like a backup option and starts feeling like real training.
If you want one next step, choose your primary goal from the table above, then build a three-day rotation for two weeks and log band level and reps, you will know quickly whether the set fits your needs.
Key takeaways
- Complete usually means multiple tensions plus a reliable anchor, not just more pieces.
- Quality shows up in connectors, stitching, and predictable tension, not flashy labels.
- Progression comes from tension, distance, tempo, and volume, track it.
FAQ
How do I know what resistance levels I need in a resistance band set?
If you are new, you typically want at least one very light option for shoulders and warm-ups, plus a couple middle tensions for rows and presses, and at least one heavy band for legs. If you cannot make an exercise challenging within 8–15 reps with good form, you likely need a heavier option or a different setup distance.
Are loop bands or tube bands better for strength training?
Tube bands feel more straightforward for classic “gym” moves because handles simplify grip, while loop bands shine for lower-body work and assistance training. Many people end up happiest with both, since each solves different problems.
Can a resistance band set replace dumbbells?
For many home programs, yes for a while, especially for beginners and intermediate training. If your goal is maximal strength or very specific loading, free weights may still matter, bands can still complement them for warm-ups, accessory work, and travel.
Is it safe to attach bands to any door?
Usually you want a solid door with a secure latch, and you want the pull direction to keep the door closed. Test with light tension first, and avoid old, damaged, or hollow doors that flex.
Why do my bands roll up during leg exercises?
Rolling often comes from thin material, incorrect sizing, or placement on smooth clothing. Fabric mini bands or wider latex bands can help, and placing the band slightly above the knee rather than directly on it often feels more stable.
How often should I replace bands?
It depends on material, storage, and how hard you stretch them. If you see cracks, fraying, sticky spots, or uneven thinning, replacement is a safer call, even if the band “still works.”
What’s the best way to progress with bands without guessing?
Pick a rep range, log band level and setup distance, then progress one variable at a time. Many people find it easiest to add reps first, then step farther from the anchor, then move up a band.
If you are trying to build a home routine that feels structured, not random, a well-chosen resistance band set plus a simple logbook can be a low-friction setup, and if you prefer a more dialed-in plan, it may help to ask a coach to match band tensions and exercises to your space and joints.